[IBS Home] [Up] [Save System Tape] [2006 Year End] [2004-5 Year End]
|
|
|
2006 Year End Procedures
*NOTE: PRIOR TO PERFORMING YOUR YEAR END PROCEDURES, BE SURE TO PRINT ANY AND ALL REPORTS THAT YOU MAY NEED, I.E. “SALESMEN SALES REPORTS, CUSTOMER SALES RANKINGS, CUSTOMER(SALESMEN/GROSS SALES/ALPHA) REPORTS AND ANY INVENTORY REPORTS, ETC.” *You may use the empty box above to check off each step. ☐ STEP 1 Finish all Reports, Invoicing & Statements for the Year.
☐ STEP 2 Run your Year End Backup (Mark this tape and DO NOT reuse it). This will be necessary if we have to rebuild your files at a future date. You may use the previous nights backup for Year End.
☐ STEP 3 Initialize Save System Tapes (Option 15 on Management Processing daily menu)  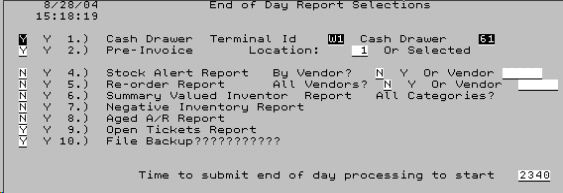 Figure
2 - Figure
2 - ☐ STEP 4 Run a complete Save System Backup (Mark these tapes and DO NOT reuse them). Call if you are not sure! ☐ Most IBS Customers previously backed up for emergency reloads. If this is the case with your location then you should skip this step. ☐ STEP 5 Go to MP Option 1 and complete the end of day menu. 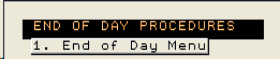 Figure
3 - MP (Management Processing) Figure
3 - MP (Management Processing)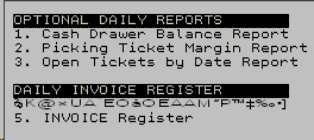 Figure
4 - Some suggested reports (options 1-5) Figure
4 - Some suggested reports (options 1-5)☐ STEP 6 Next Go to RP Option 12 and answer “Y” (Yes) to End of Year.
☐ STEP 7 See Detailed Description.
S tep 1 Run your Reports. ☐ Once you select the Year end option all Daily, Month and Yearly sales figures are reset to zero.
S tep 2 Run your Backup ☐ Select M P Option 1, 12 (Daily File Backup). Do not use the system while running a backup. This was previously M P Option 1, 6. Notes This tape should not be used for at least seven years. That will protect you in the event you need to reconstruct your Sales history from a previous year. Normally in the event of tax audits or other emergencies.
STEPS 3-4 ARE OPTIONAL YOU SHOULD RUN A SYSTEM SAVE IF ONE OF THE FOLLOWING CONDITIONS HAS OCCURRED 1. You do not have or cannot find your current system save tape 2. Your current system save tape is 5 or more years old SKIP TO STEP 5 IF YOU ARE NOT DOING A SYSTEM SAVE S tep 3 Initialize Tapes ☐ Select two tapes for your backup. M U Option 14 (Initialize Tapes) and initialize each tape. This was M P Option 1,8 on earlier BMS menus.
Mark each tapes as follows ☛ SYSTEM SAVE EMERGENCY TAPE 1 OF __. (You will fill in the last part after completing the System Save, i.e. when you know how many tapes it requires). S tep 4 Run a Save System ☐ All users must be signed off. Go to Workstation W1 (this option will not work from any other workstation). ☐ Verify that you are on workstation W1 (the signon screen will display which workstation are are on)
Save Entire System
Screen 2
Display Device...: W1 User...................: Your User ID Tape Device TC _____ _____ Prompt for Commands... No Check for active files... No Message queuedelivery... *Notify Starttime... *Current ☐ Sign-on the terminal as QSECOFR or as a Security Officer. If you are not a security officer you cannot continue. ☐ Place a tape into the Tape Drive and close the door. ☐ From a command line key GO SAVE then press ENTER. ☐ Next key a 22 (System Data Only) and Press ENTER. You will see the following menu display: “Save Entire System” ☐ Press ENTER to continue. The final save screen will then display (see box displayed at left). ☐ Key in the following: Prompt for commands, N (No); Check for Active files, N (No); Message Queue Delivery, *NOTIFY; Start Time, *CURRENT. Then press ENTER. The system save will begin. ☐ Go get some dinner and return after three-four hours. The System will prompt you if for a second tape (if required). ☐ If you are prompted for a second tape. Place the tape in the tape drive and answer the System console (Workstation W1) message with a “G” (Go) then press ENTER. Notes If you didn’t initialize enough tapes (i.e. 1-2) you will have to cancel the procedure and return to step 3. ☹ Failure to successfully complete this option means that you will NOT have an emergency restore system tape in the event of System Failure! That could result in days of down-time if your System Fails!!!
S tep 5 Ending
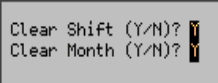
the Month ☐ Go to M P Option 1 (End of Day Menu). Select Option 1 (Cash Drawer Balance Register) for the YEAR. Choose the option to clear shift for the day and month. ☐ Next make sure all Invoice Registers have been run for the Month. Notes: This option will reset your Daily and Month to date figures. You take this option at the end of every month. 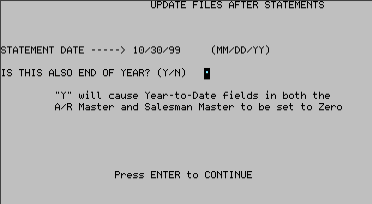 S tep 6 Ending the Year ☐ Go to R P Option 12 (A/R File Update). Key a “Y” (Yes) in the End of Year Field. Then press ENTER. Notes This option will clear out your Daily, Month-to-date and Year-to-date Sales figures. S tep 7 Happy New Year “Celui qui cherche à être honnête et bon vivra longtemps, il sera traité avec justice et respect.” Proverbs 21.21 He who attempts to be honest and good will live a long life. He will be honored with justice and respect. Proverbs 21:21
Please note that the End of Year Procedures are different from previous years. If you have any questions you can reach IBS at: 888-640-1252. |
|